Test harness administrator guide
Overview
This is the administrator guide for the Pensions Dashboards Programme (PDP) test harness central digital architecture (CDA) stub. The intended audience is administrators and testers at directly connecting organisations (DCOs), responsible for setting up and operating the environment for system testing. This system testing is required before integration testing.
This document explains how to deploy, configure and operate the CDA stub to facilitate system testing.
A separate document describes how to run the tests and use the CDA stub to assert the system-under-test has the correct behaviour in the test scenarios.
The system-under-test makes API calls to the CDA server. The CDA stub can be configured to the system-under-test to receive and respond to these CDA calls. The CDA stub is designed to behave in accordance with the test scenarios and test data, and to allow a tester to assert that the correct calls were made to the CDA stub. It also supports the collection of evidence that these tests were executed correctly.
The current version of the CDA stub is based on technical standards version 1.1 and reporting standards version 2.2.
Back to topDownloads
Download error-scenarios-postman-collection.zip
This zip folder contains:
- 8. MaPS System Testing - Error scenarios.postman_collection (1).json
Prerequisites
The CDA stub is supplied as a Linux container image. A mechanism for running containers is required - be that a simple machine running Docker or an alternative container runtime compatible with Linux images, or a full container orchestration platform such as Kubernetes.
It is possible to run Linux container images in multiple operating systems, including Microsoft Windows, Apple macOS and Linux.
Alternatively, the CDA stub can be built from source (for example, as an alternative container image that meets the DCO’s bespoke requirements, or as a Java application run in a different way). See appendix A: build instructions for more information.
The recommended resource requirements for the CDA stub container are at least 1GB of memory and 2 CPU cores.
To use mTLS (as per the technical specification), TLS must be enabled for the CDA API within the CDA stub. This requires a valid certificate to be injected into the container, issued for the domain where the container will be exposed to the system-under-test. See mTLS configuration for more information.
No outbound network connectivity is required from the CDA stub. However, the container’s http(s) endpoint must be reachable (as an inbound connection) from the system-under-test. Note that this outbound network connectivity requirement may change in a future version of the CDA stub, when mTLS OCSP support is added.
Back to topRunning the CDA stub
The following section covers how the CDA stub can be run as a Docker container. These instructions can be adjusted for alternative container orchestration platforms.
Container image download
The container image is provided by MaPS to all DCOs.
The instructions below assume the DCOs have been supplied a password directly from MaPS (<password> in the example command below).
To pull the container image from the repository, first authorise access to the container registry:
docker login -u pdp-pull -p <password> mapspdp.azurecr.io
Then pull the image (download it locally) using the following command, for the desired version (note that latest can be used to get the most recent container image; or 20260519101514 can be used from PDP test harness):
docker pull \
mapspdp.azurecr.io/pdp-stub-cas:20260519101514
To confirm the image has been correctly downloaded, list the images with the following command:
docker image ls
The output should look something like below:
REPOSITORY TAG IMAGE ID CREATED SIZE
mapspdp.azurecr.io/pdp-stub-cas 20260519101514 202014159425 2 days ago 389MB
Running the container
The CDA stub container can be run using the following command (explained in more detail in the next configuration section):
docker run \
-p=8081:8081 \
-p=8443:8443 \
-v=./casTestLogs:/cas/logs \
-v=./server-certificate.pem:/server-cert/server-certificate.pem \
-v=./server-certificate.key:/server-cert/server-certificate.key \
mapspdp.azurecr.io/pdp-stub-cas:20260519101514
The expected output is shown below:
Note that the run command above binds a local directory casTestLogs to the container logs directory for convenient access. Further information on logs inspection is described in the following sections.
Container configuration
As a standard container, the CDA stub supports all the normal container configuration (see docker run documentation).
The most important configuration options are documented below.
Ports
Within the container, the CDA stub API listens on TCP port 8443 and 8081 for https and http traffic respectively. These ports need to be exposed on the host that it is running on (or via alternatives like Kubernetes networking configuration), in order to connect to it from the system-under-test.
To map this to a port on the host, you can use the docker -p argument, such as in the example below:
docker run
…
-p=${HTTPS_PORT_ON_HOST}:8443
-p=${HTTP_PORT_ON_HOST}:8081
…
mTLS configuration
For further details of mTLS in system testing, see the mTLS guide. Also see additional documents from PDP about mTLS, which will give the authoritative description of mTLS in PDP.
This section describes establishing https mTLS transport channels between the system-under-test and CDA stub.
It is assumed that the administrator has a good understanding of mTLS.
High-level overview
The system-under-test is the “client”, and the CDA stub is the “server”.
- the client will verify that the server has a valid TLS certificate. It is expected that this is signed by a public trusted certificate authority
- for the client to send requests to the server, the client will use the private key and certificate issued in the crypto pack (signed by the PDP certificate authority Root)
- the CDA stub will validate that the client’s certificate is signed by the trusted certificate authority Root. If not, it will reject the TLS connection. Note that the CDA stub’s truststore is pre-populated with the PDP certificate authority Root’s certificate chain
CDA stub configuration
The CDA stub needs to be configured with a server certificate for TLS. This certificate must match the domain on which the CDA stub will be reached.
It is assumed that this certificate will be obtained by the DCO from a public certificate authority (if your organisation requires use of a private certificate authority for test environments, see the appendix in the mTLS guide).
The server certificate must be injected into the container at start-up time. This is done by mounting the certificate file (PEM format) and private key (with no passphrase). The expected paths within the container are: /server-cert/server-certificate.pem and /server-cert/server-certificate.key. For example, if the files on the host are in the current working directory, called server.pem and server.key respectively, then start the container with:
docker run \
-v=./server.pem:/server-cert/server-certificate.pem \
-v=./server.key:/server-cert/server-certificate.key \
...
When the CDA stub container starts, it will write to the console a message about the certificates in use, and that it is listening for https connections on port 8443.
Disabling TLS and mTLS
For the CDA stub API, mTLS is enabled by default. For disabling TLS, and therefore mTLS, the environment variable ENABLE_SSL=false can be injected. Only http traffic through port 8081 will be available.
docker run \
-e=ENABLE_SSL=false \
...
If TLS is disabled, binding the server certificate can be ignored.
It is possible to disable only the client authentication (mTLS), keeping TLS. It can be achieved by injecting instead the environment variable ENABLE_MTLS=none.
docker run \
-e=ENABLE_MTLS=none \
...
Use of HTTP
Even when mTLS is enabled, the CDA stub will still also accept API calls to the unencrypted HTTP endpoint. This is to facilitate troubleshooting (for example to allow a tester to send requests to the CDA stub when exploring why a test scenario failed).
The call log will clearly indicate whether http was used, or https with mTLS.
The other features of the CDA stub (for example the web-console for browsing the database) will use only HTTP.
Exposing the volume for log files
Within the container, the CDA stub writes logs to the directory /cas/logs/. You can bind mount this directory to a directory on the host, to make the log files easier to access and to persist the logs beyond the lifetime of the container.
The example below mounts the host’s directory ./casTestLogs into the container at the path /cas/logs where the logs are written, by using the standard -v flag.
docker run
…
-v=./casTestLogs:/cas/logs
…
Database credentials
The CDA stub has an internal database to track creation/modification/deletion of resources. This can be inspected to assert the expected behaviour of the system-under-test.
The default database username is sa, with no password needed.
However, the administrator can configure a custom username and password for the database. This is done by passing environmental variables to the docker run command:
docker run -e=DB_USER=${USER_NAME} \
-e=DB_PASS=${USER_PASSWORD} ...
Usage
The CDA stub’s URL will depend on the domain name of the host it is run on, and the port it is exposed on. For simplicity, the documentation below assumes the domain name “example.com” and port 8443, with a client-trusted server certificate.
The CDA stub API
The CDA stub exposes the API, as per the technical specification. For example, the endpoint for ‘rreguri’ calls is https://example.com:8443/rreguri.
However, note that communication is over HTTP (not HTTPS, and not mTLS).
For the system-under-test to communicate with the CDA stub, the administrator must configure the system-under-test with the URL for reaching the container’s endpoint. The system-under-test must also be configured to accept the HTTP connection, rather than enforcing mTLS.
It is expected that HTTP requests are sent to the CDA stub by the system-under-test, rather than directly. However, a tester can send requests directly to check that the CDA stub is running correctly, and/or to troubleshoot errors. See the open API console section.
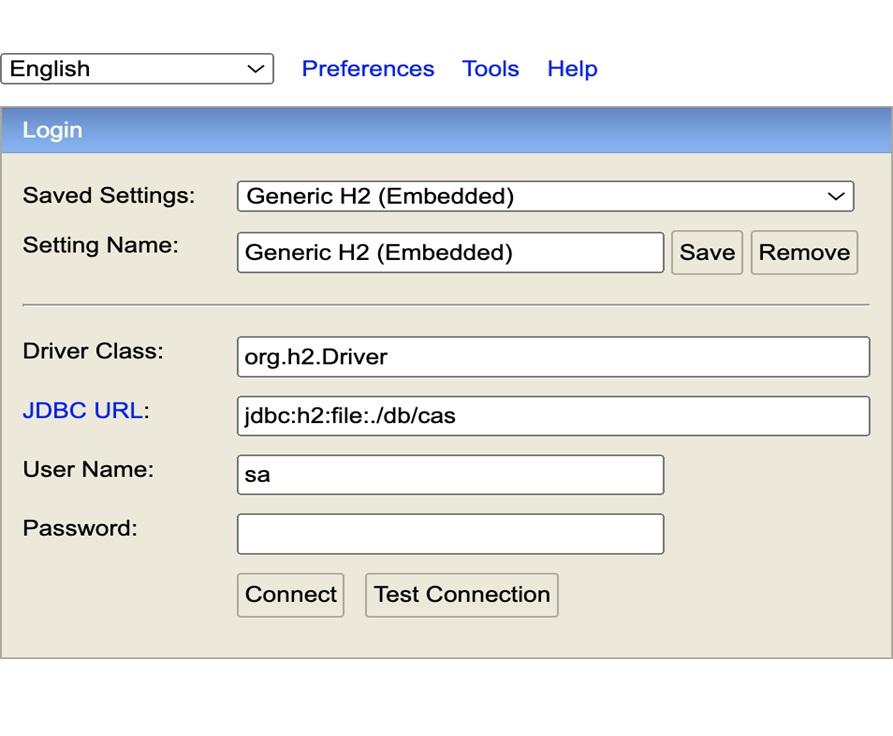
Accessing/viewing the database
Console-access to the internal database is at https://example.com:8443/data. For standard documentation on using this database, see the H2 database quickstart documentation.
The login form is pre-populated to match the default configuration:
- the user name and password (default user name is sa, with no password)
- the JDBC URL’s default is: jdbc:h2:file:./db/cas
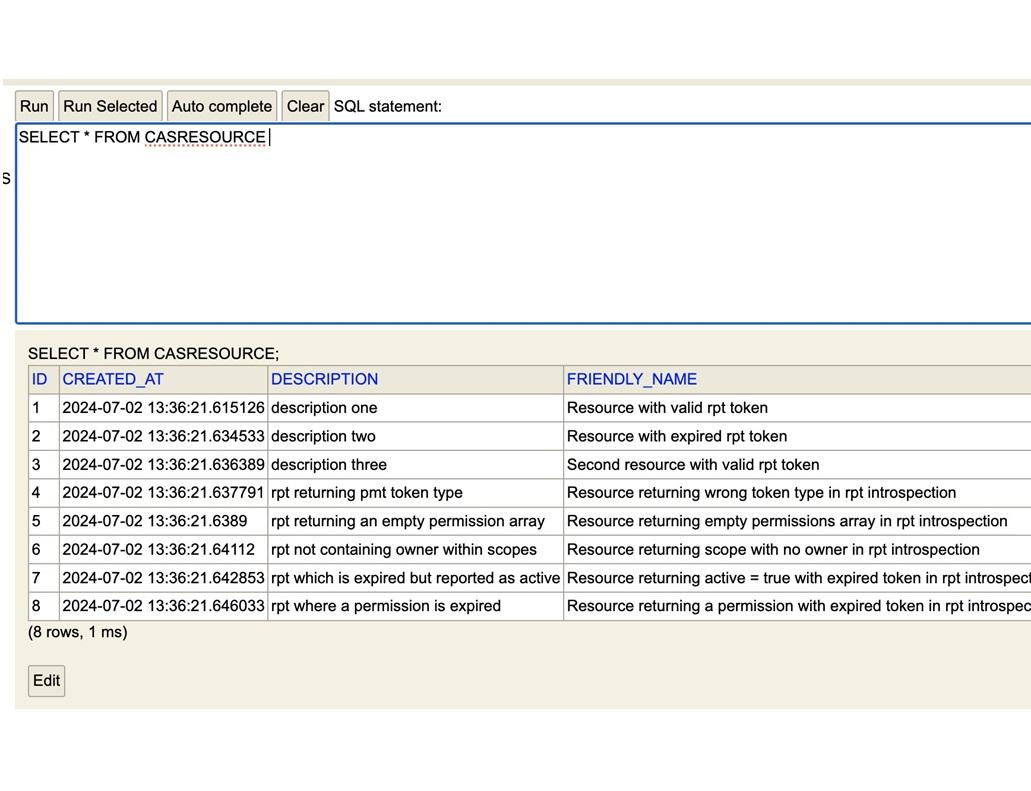
Once the user is logged in to the database client, they will be able to see the relevant User table (CAS_USER) and Resource table (CAS_REGISTERED_RESOURCE). and to query them using standard SQL queries.
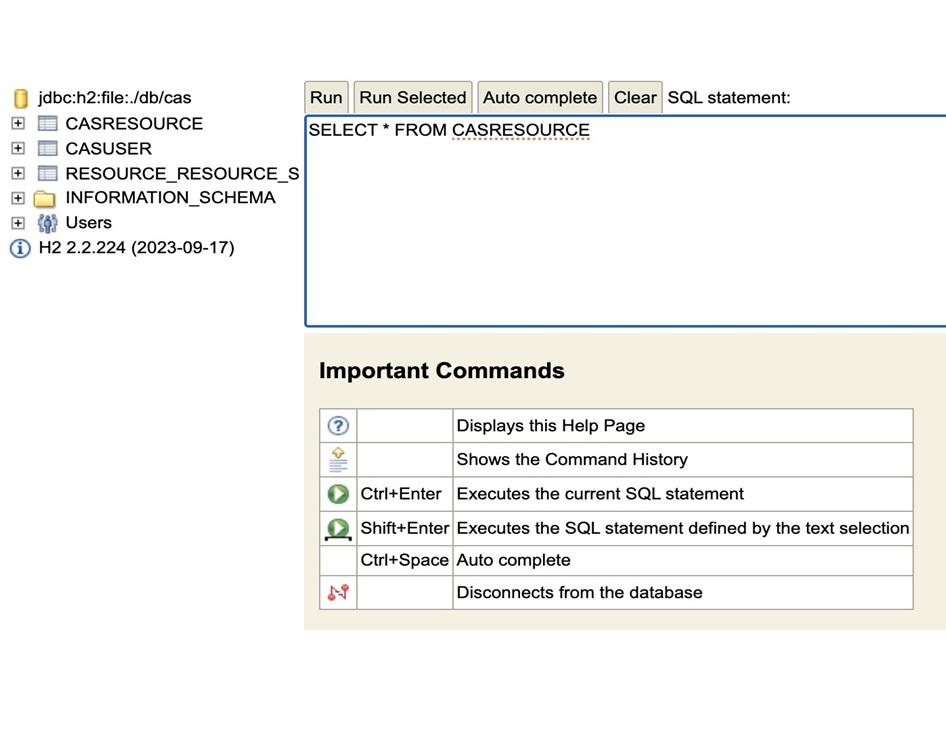
Viewing the records will help the users to analyse whether the relevant test scenarios have been run correctly and corresponding records have been added/updated/deleted as required.
Log files
The CDA stub helps testers to assert the system-under-test behaved correctly. This includes looking at the call log to see the http requests and responses.
The log file for this is named http.log (see configuration information in the section exposing the volume for log files for details of how to mount this volume in the container). This file contains all HTTP requests and responses. See the separate testing guide for how to interpret that log.
Additionally, the http requests are printed in the console output of the docker run command (if not using detached mode).
The file server.log is also created. This can be used for troubleshooting purposes, if there are issues with the CDA stub.
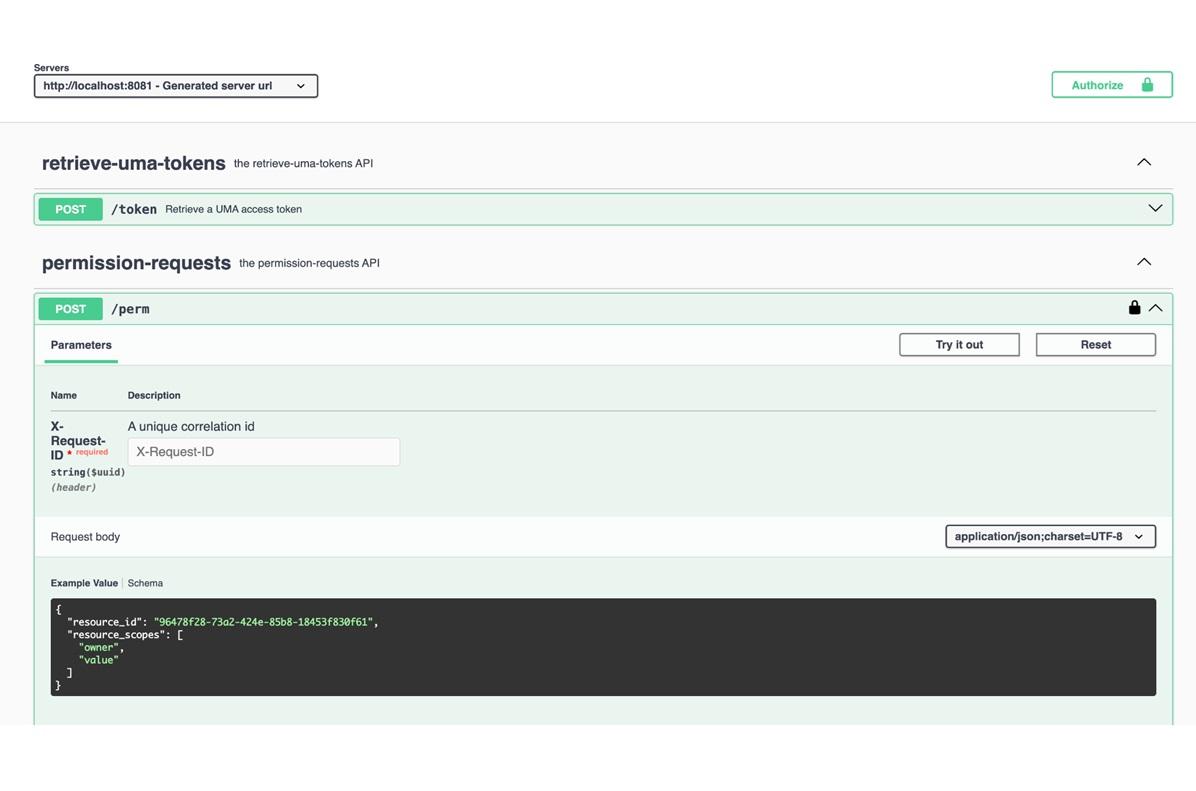
Open API console
The Open API console is at https://example.com:8443/swagger-ui/index.html, providing a console for making API calls against the endpoints.
This console can be used to send HTTPS requests directly to the CDA stub. This will typically not be used during system testing; the requests will be sent by the system-under-test.
However, it may be useful when investigating failing tests to send requests manually to the CDA stub. This allows individual requests to be tried, for example to see why a given response is returned and to explore variants of the request.
It is possible to manually make the HTTP requests for test/troubleshooting purposes. This can be done in multiple ways, either by using the provided Open API console, or a third-party software allowing to make HTTPS or HTTP requests (for example, cURL, Postman).
To make the HTTP request using the Open API Console, navigate to https://example.com:8443/swagger-ui/index.html. This displays a user-friendly UI allowing to make calls to all endpoints with customised input data. Note that some requests require sending the PAT token in the Authorization header to authorise the request, which can be provided by clicking on the Authorize button as seen in the top right corner of the screenshot below:
Note that the new reporting endpoints do not present details or examples. To view these, it is advised to paste the latest version of the Open API into SwaggerEditor and view examples and schema there.
Back to topTroubleshooting
Troubleshooting the container
The server.log file (see log files section) contains details from the server, including warnings and errors. This is a recommended starting point when investigating issues with starting/running the container.
It is also worth verifying that the container is still running correctly. For example, if using Docker on the host then the command below will list all containers, and show their status:
docker ps -a
Network connectivity
As described in the section on port configuration, within the container it listens on port 8443 and 8081. This needs to be mapped to a port on the host, or if running in a container orchestration platform such as Kubernetes then mapping this pod’s port to an externally accessible endpoint.
As described in the section on the CDA stub API, the URL (domain name and port) will depend on how and where this container is run, and where it is accessed from.
A simple way to check network connectivity is the curl command below, which should return a 200 response (this example command uses example.com, so assumes it is being run from the host where the container is running):
curl 'http://example.com:8081'
To see if the HTTPS port is reachable, the curl command below can be used. However, when using mTLS this connection should be rejected (but the rejection will still look different from if there were no web server listening on that port).
curl -k --verbose 'https://example.com:8443'
cURL can be used also for testing mTLS connectivity providing the certificate information, in this example, from the provided crypto pack for system testing:
curl \
--cert-type PEM \
--cert certificate \
--key certPrivateKey \
--verbose \
https://example.com:8443
Troubleshooting failed tests
For tips on troubleshooting failing test scenarios, see the separate testing guide document.
Back to topAdditional material
This document is not intended as an introduction, or as instructions for how to carry out the system testing. As such, it complements other system testing material published by MaPS.
Back to topAppendix A: build instructions
The main way to run the CDA stub is to use the pre-built container image. However, it is possible to build the CDA stub from source, and thus to package it in whatever way is desired.
The CDA stub is a Spring Boot app. It requires Java version 21, and is built using Gradle 8.7 or newer.
Code repository
There is a git repository for the CDA stub, which includes instruction files for building and details of the code design of the CDA stub.
This git repository can be found at: https://github.com/moneyadviceservice/pdp-test-harness/
To clone the git repository, the user needs to authorise access and then execute the following command:
git clone \
https://github.com/moneyadviceservice/pdp-test-harness.git
The main branch contains the very latest code - this could include code under active development. Each released version is tagged. For example, to view all the tags, run the command:
git tag
To view the source code for version 1.1.2, run the command:
git checkout 1.1.2
Container image build instructions
To build the CDA stub, and to package it as a container image, run a command like that below:
docker build . -t pdp-stub-cas:latest \
--build-arg API_PORT=8081
The dockerfile contains the build commands used to compile the code, and the commands used to create the container image.
If an organisation has requirements that mean the pre-built container image cannot be used (for example, only pre-approved hardened base container images can be used), then this Dockerfile can be adjusted as appropriate to build and use a custom container image.
Java build instructions
The project can be built directly (not using Docker) using Gradle. These commands assume that Java 21 and Gradle 8.7 or newer are pre-installed.
gradle build
The JAR file is created in ./build/libs/.
Running the JAR file
If building the Java JAR file from source, one can run the application directly. The command below will run the application:
java -jar <path-to-jarfile>
Environment variables can be passed in the standard way with the -D argument. For example, the command below configures the listener port, database user and database password:
java -DPORT=${PORT} -DDB_USER=${USER_NAME} \
-DDB_PASS=${PASSWORD} -jar <jarfile_placeholder>
With the application run using the JAR file, the log files (http.log and server.log) are available under ./logs/directory, relative to where the JAR file is run from.
Baking in the server certificate into a new container image
When running the CDA stub container in a cloud environment or in an on-prem Kubernetes cluster, the need to mount the server certificate and key files complicates things.
A workaround to this is to build a new container image, using the existing container image as the base. This allows one to bake in the server certificate and key files into a new container image, for example with Dockerfile commands like those below:
COPY ./server.pem /server-cert/server-certificate.pem
COPY ./server.key /server-cert/server-certificate.key
The Dockerfile in the code repo shows how the current image is built.
Back to topAppendix B: hosting the CDA stub container
For hosting the CDA stub container, requirements include:
- The CDA stub container must be run somewhere that the system-under-test can reach it.
- The CDA stub must have a valid server certificate that matches the domain.
- The server certificate and key must be injected into the container at start-up by attaching a volume (alternatively, see Baking in the server certificate into a new container image).
- The CDA stub must be able to do mTLS client authentication. This means one cannot put a load balancer or reverse proxy in front of it, which would do TLS termination.
There are many ways to run a container (in the cloud, or on-prem). However, the requirements above can make this complicated.
A simple way to run the CDA stub is to run a virtual machine with the container on it. In brief, this would require the following steps:
- Provision a VM (here we assume Linux).
- If the VM does not have a domain, then create a DNS A-Record (using the IP of your VM that is reachable from the system-under-test).
- Generate a server certificate for the VM’s domain (for example, one could use Let’s Encrypt; note that domain validation will require an inbound network connection to the VM from Let’s Encrypt).
- Install Docker.
- Set up and run the CDA stub container, as per the instructions in this document.
- The URL of the CDA stub container will use the VM’s domain.
Changelog
Last updated:19/05/2026
19 May 2026
19 May 2026
- In 'Running the CDA stub' the docker image hashsum has been updated following the test harness update.
1 May 2026
1 May 2026
- The test harness has been updated, following the identification of a bug where the Test Harness was returning a 400 Bad Request for API requests when the submission_id field was present but set to null. This has been resolved by updating the validation logic in the stub's controller code to check whether the submission_id key exists in the request, rather than checking whether its value is non-null.
- In 'Running the CDA stub' the docker image hashsum has been updated following the test harness update.
- Minor typo fixes.